Showing posts with label Tutorials. Show all posts

Thursday, September 22, 2011

Dinosaur Mittens

I made these little dinosaur mittens for my nephew's 2nd birthday. I'd seen something similar - shark mittens on What I Live For (through TipJunkie). I actually had some light green fleece leftover from another project so I thought I'd make dinosaur mittens instead. And I added elastic in the wrist to help keep the mittens snug.

These are really simple to make. They only took me 45 minutes. Now that I've made one pair I could probably do it in 30. If you want to make some of your own here is what you will need:


  • 1/4 yd green fleece
  • scraps of green and white felt or fleece
  • 1/4-inch knit elastic
  • 2 black buttons (mine were 1/2-inch wide for size 2T mittens)
  • green and black thread
  • graph or plain paper and a pencil

Start by tracing around your child's hand on a piece of graph or plain paper:

As you can see I'm only loosely tracing the hand. This is to allow for the actual volume your child's hand will take up in the mitten. From this we will add a seam allowance:

The wavy line represents where the child's wrist is and where the elastic will be sewn in. From that wavy line I know I want a 1-inch finished cuff, so I've added 1 1/2 inches to allow for the cuff and it's 1/2-inch seam allowance. Everywhere else I'm just using a 1/4-inch seam allowance. Cut out your pattern and pin it to your fleece. Cut 4 (2 sides for each mitten):


Now fold over the cuffs 1/2 an inch, wrong sides together (if your fleece has a wrong side) and stitch down:


Now we'll add the elastic. Following the wrist placement on your pattern, start by tacking down the end of the elastic on the wrong side of the fabric with a few stitches with your machine. You will want to use a medium zig-zag stitch and long stitch length (I used 4) to allow for stretch. Start stitching across the mitten while simultaneously pulling on the elastic:


This creates the gathers and will allow the elastic to stretch around your child's wrist and stay snug:

Do this for all 4 pieces.

Now we'll add the button eyes. Decide where you want your buttons to go:


Since fleece is a fairly loose material, I don't recommend knotting your thread. Instead, pull your thread through the button, leaving a long tail behind it on the wrong side:


This way you can tie the loose ends together when you are done stitching on the button:


MAKE SURE you are stitching your buttons to two opposing sides:

You don't want two left- or two right-handed mittens!

Now for the trim. For my dinosaur ridges I cut out two pieces green felt, 1/2" x 4" each. If you are making mittens larger than a 2T, you may want to increase the length. Then I cut zig-zags on one side of each piece:

I did the same for the teeth, cutting 1/2-inch wide pieces, zig-zagging, then trimming to fit the thumb and forefinger. You will place the trim with the flat side facing out like so:


Now pin your mittens right sides together with the trim sandwiched in between:


Stitch all the way around the outer edges with a 1/4-inch inseam. You will want to reinforce the crook of the thumb and forefinger - just stitch over it a couple of times:


Now you will clip into that crook almost to the seam allowance:

At this point I also like to trim the seam allowance to about 1/8th of an inch so there's more room for fingers and thumbs.

Turn right side out and ta-da!

You have a very cute pair of dinosaur mittens! If your teeth or green ridges look a little wonky, you can trim them down if necessary. I had to trim the teeth just a little after sewing myself.

Please let me know if you end up making a pair yourself!

Friday, January 14, 2011

Ruffled T-Shirt Dress

We are moving so my daughter has started at a new school. Since she is coming in in the middle of the school year, all they had left of their school T-shirts were larges and extra larges. Caralie is a small, at best. Luckily I had seen a tutorial on Make It and Love It for converting a t-shirt into a ruffled dress. I loosely followed the tutorial since I had to do some major overhauling of this thing:

She could've worn it as a nightgown it was so big. I ended up cutting out the sleeves, taking it in significantly, and refashioning the sleeves just to make the t-shirt portion fit right. The shirt was still super long, so I cut off about 7-8 inches off the bottom to use as the lining for the ruffles. I bought 1/2 yard of heather gray jersey at Joann and cut it into 5 1/2 x 60 inch strips. I hemmed the strips, sewed them into a round, then gathered them and stitched them to the lining. I think it turned out pretty cute:

Caralie had gone to bed before I'd even fixed the sleeves, so she was completely surprised when she woke up in the morning to find her new t-shirt dress:

She was very happy with the results and told me that I am the best mommy in the world. That almost made it worth sewing with knits. I am not converted to knits like everyone else in blogland. At least they are forgiving and hide a multitude of flaws.

Now I just need to make a matching hair accessory with the scraps.

Maybe.

Monday, November 15, 2010

Twin Baby Quilts

Now that my sister has had her baby shower (not to mention her girls!) I can finally show you the quilts I made for my nieces.

They both look like this:


You'll notice there are 3D yellow flowers in the top right and bottom left corners. I made each quilt the same but made one with yellow flowers and one with pink flowers:

That way they could tell their quilts apart from the front. The yellow flower one is backed in yellow snuggle fleece and the pink flower one is backed in pink.

They each have jumbo white rick-rack as a border in the front:


The fabric comes from the Lucy Fun Flowers collection by Lakehouse. I just love the happy, bright colors. The fleece was thick enough that I didn't have to use any batting. And I followed the tutorial for machine binding found here. If you are interested in trying to make a quilt, the Basic Quilt Along Series at Make and Takes is a great start. It's written by Amy of Diary of a Quilter and she is a great teacher! Quilting is really not hard once you get the hang of it and I encourage even novice sewers to give it a try. Make a table runner or a small wall hanging first so you don't get overwhelmed.

For these quilts I adapted a pattern that came with my new Flying Geese Ruler. I basically cut it in half and then added borders.

Tuesday, November 2, 2010

Halloween Costume: Part II

Hermione needed a Griffindor tie for her costume. Unfortunately, Harry Potter is not as popular commercially as it once was so it was impossible to find gold and maroon striped fabric to make the tie. I had to get creative.

I ended up purchasing a half-yard (more than I needed) of maroon cotton sateen and a spool of gold grossgrain ribbon. I figured I'd adhere the ribbon to the fabric to make stripes. Yes, I'm crazy. But it did work. Here's how I did it all:

I started by following the Little Tie Tutorial from Sewing in No Man's Land. I made my pattern on a piece of wrapping paper, cut it out and then pinned it to the fabric:

I ended up cutting it out with pinking shears to prevent any fraying. Now it was time to make the stripes. I cut a bunch of strips of Heat N Bond the same width as my ribbon:


Then ironed them to the fabric:

I cut off the excess so I wouldn't gum up my iron and ironing board. Then I removed the paper backing and ironed the ribbon on. For some reason I didn't take a photo...? Anyway, it was time to hem the bottom of the tie. I deviated from the tutorial and simply folded over the bottom, pinned it:

and sewed it together with a 1/4-inch seam allowance:


I did the same thing on the other side and then turned them right sides out and pressed:


The next step was to sew the back seam:


Then turn it right-side out and press:


Then, following the tutorial, I made a neck band with a strip of the sateen and some velcro. I followed the instructions for turning the tie, but because my fabric was so stiff with the ribbon, I didn't get the look I was going for:

No neat little knot at top. So. I scrapped that idea and did this instead:


Gasp! I just cut up all my hard work! But it's okay. I took that middle section and turned in the raw edges like so:


Then I threaded the neck band through it and tacked it in place with a few stitches:


Then I turned it over and tacked the tie at that back center seam:

And folded the bottom in half and tacked that in place:


And when you turn it around you have the illusion of a windsor knot:


Much better!

Wednesday, October 6, 2010

Spider Puffs

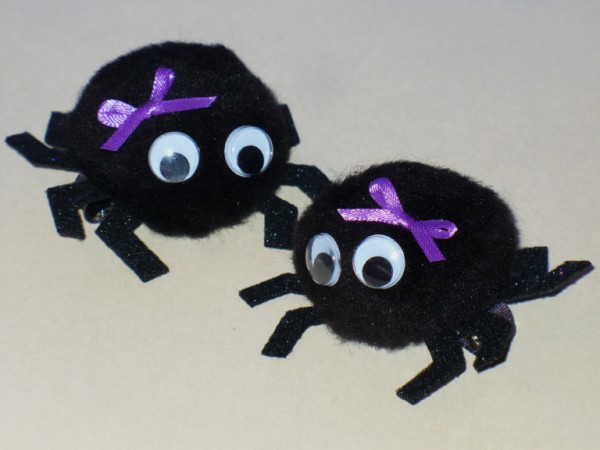
I made these cute spider puff clips for Caralie to wear this month. I saw something similar at Target and figured I could make my own.

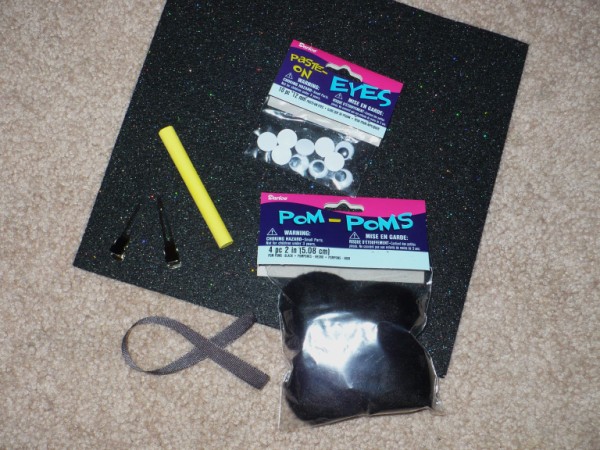
The googly eyes are hysterical. And I even gave them their own bows so they could be "girl" spiders. Here's a list of materials needed if you want to make your own:

Super-stiff black glitter felt
2" black pom-poms
googly eyes
light-colored chalk
alligator clips
4" of 3/8-inch wide black grosgrain ribbon for each clip
scissors
hot glue and glue gun
skinny purple ribbon for bows (if desired)

STEP 1: First draw legs on a piece of cardstock. I based my legs around a quarter-sized circle as seen below:

Cut out the legs and place on matte side of felt. Rub with chalk:

Cut out felt legs:


STEP 2: Hot glue pom-poms to legs (glitter side up), then hot glue googly eyes:

STEP 3: To make ribbon-covered clips like the ones above, hot glue one end of ribbon to bottom of clip as shown and wrap around hinge:

Now glue ribbon down to top of clip and wrap under and glue to the inside:

This gives the clip a little more grip in the hair.

Now glue clip to underside of spider:


STEP 4 (optional): Make tiny bows and glue to spiders:

Now you have some cutie-patootie spider puffs!

Caralie was so excited to wear these to school today. They even stayed put when she twirled around in her new Halloween skirt:


I'll post about that skirt later. I made it using the Circle Skirt Tutorial from MADE.

HAPPY OCTOBER!